
Knowledge Base · WordPress Guides
How to Set Up WooCommerce for a Kenyan Online Shop (KES, M-Pesa, Delivery, VAT)
WooCommerce turns your WordPress site into an online shop. This guide sets it up the Kenyan way: prices in shillings, M-Pesa at checkout, delivery fees by area, and VAT — so you can take your first order the same day.
Before you start
- WordPress installed with a working padlock (HTTPS) — customers will not pay on an insecure page. See Install your free SSL.
- A paid hosting plan with daily backups — shop orders are business records.
- Your M-Pesa Till or Paybill details and, for automatic confirmation, access to the Safaricom Daraja developer portal or a payment provider account (see Step 4).
Step 1: Install WooCommerce
Plugins → Add New Plugin → search WooCommerce → Install Now → Activate. The setup wizard opens.
Step 2: Store details in the setup wizard
- Where is your store based? Kenya — Nairobi (or your county).
- Address — your business address (appears on invoices).
- Industry / product types — choose what fits; you can change later.
- Skip optional paid extensions for now.
Step 3: Currency and general settings
WooCommerce → Settings → General:
| Setting | Value |
|---|---|
| Selling location(s) | Sell to specific countries → Kenya (add others if you ship abroad) |
| Currency | Kenyan shilling (KSh) |
| Currency position | Left with space → KSh 1,500 |
| Thousand separator | , |
| Decimal separator | . |
| Number of decimals | 0 (prices without cents) |

Step 4: Payments — M-Pesa, cards and cash on delivery
Open WooCommerce → Settings → Payments.
Option A: Automatic M-Pesa (STK push)
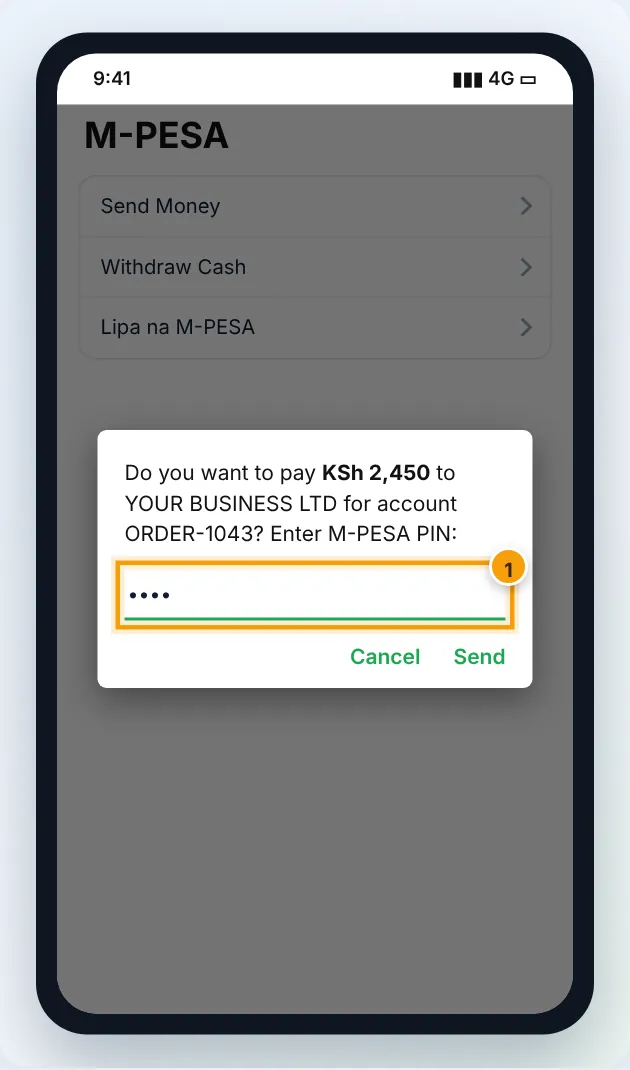
Customers enter their phone number at checkout and confirm with their M-Pesa PIN; the order is marked paid automatically. You need either:
- an M-Pesa plugin using Safaricom Daraja (several exist on wordpress.org — choose one with recent updates and good reviews). You create an app on developer.safaricom.co.ke, go live with your Till/Paybill, and paste the Consumer Key, Consumer Secret, Shortcode and Passkey into the plugin; or
- a payment provider such as Pesapal, Flutterwave or Paystack that supports M-Pesa and cards in one plugin — easier setup, a small fee per transaction.
Option B: Manual Till/Paybill (no plugin)
Enable Direct bank transfer (rename it Lipa na M-Pesa) and write clear instructions: “Pay to Till 123456, then enter the M-Pesa code in the order notes.” You confirm payments manually before dispatching. Simple, but slower and easy to get wrong at volume.
Cards
Use WooPayments, Stripe, Pesapal or Flutterwave for Visa/Mastercard.
Cash on delivery
Enable Cash on delivery, and limit it to your local delivery zones.
Never ask customers to send M-Pesa to a personal number shown on the website. Use a registered business Till or Paybill — it builds trust and keeps your records clean.
Step 5: Delivery zones and fees
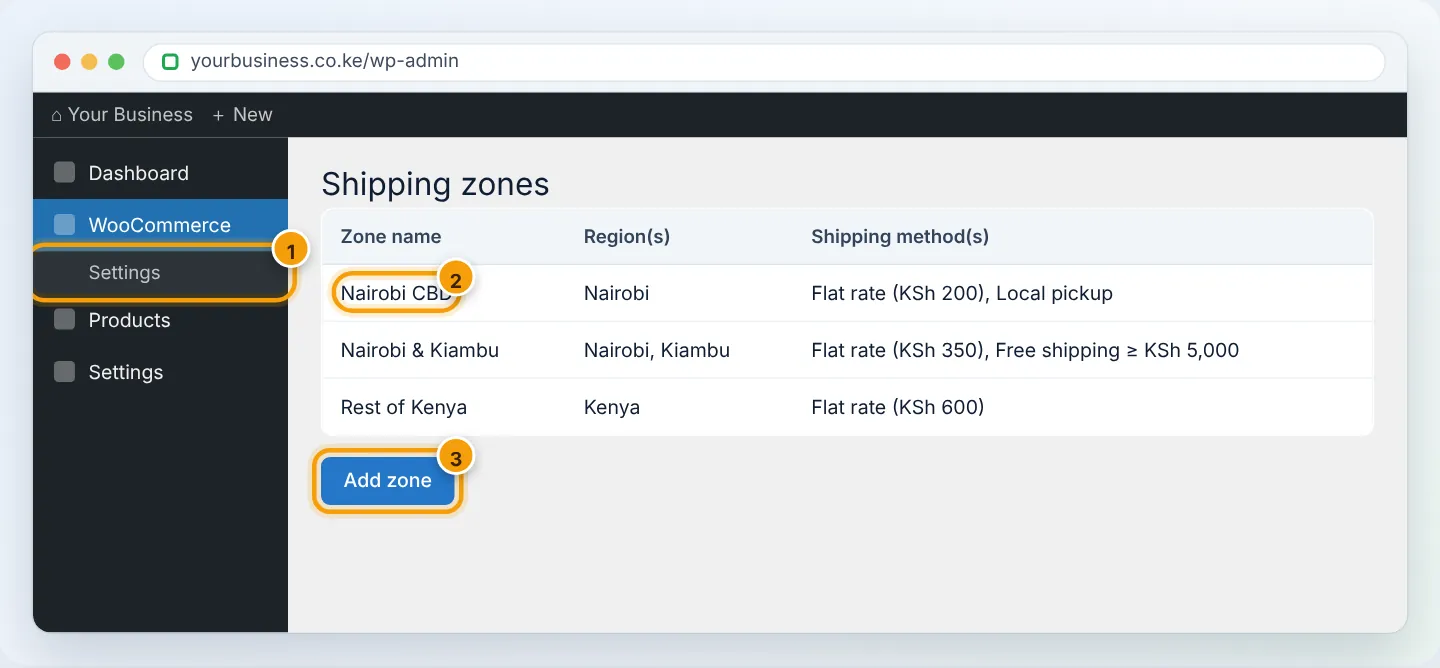
WooCommerce → Settings → Shipping → Add zone. Create zones from most specific to least:
| Zone | Regions | Methods |
|---|---|---|
| Nairobi CBD & nearby | Kenya → Nairobi (add postcodes or limit by areas if you like) | Flat rate KSh 200; Local pickup (free) |
| Rest of Nairobi & Kiambu | Nairobi, Kiambu | Flat rate KSh 350 |
| Other counties | Kenya | Flat rate KSh 600 (courier/matatu parcel) |
| Free delivery | (within each zone) | Free shipping — minimum order KSh 5,000 |
Step 6: VAT (if you are VAT-registered)
Kenya’s standard VAT rate is 16%. WooCommerce → Settings → General → Enable tax rates, then Tax tab:
- Prices entered with tax: Yes (most Kenyan shops quote VAT-inclusive prices).
- Standard rates → Insert row: Country
KE, Rate16.0000, NameVAT, Shipping ✅. - Display prices in the shop: Including tax.
Not VAT-registered? Leave taxes disabled. For eTIMS invoicing requirements, speak to your accountant — several Kenyan plugins integrate WooCommerce with KRA eTIMS.
Step 7: Add products
Products → Add New Product:
- Name and description — clear, with sizes, materials, warranty.
- Regular price in KSh (e.g.
2450). Sale price for discounts. - Product image — square, at least 800×800 px, under 200 KB (compress first).
- Inventory → SKU and stock so you do not oversell.
- Categories so customers can browse.
Step 8: Emails, pages and a test order
- WooCommerce → Settings → Emails — set the From name and address (e.g.
orders@yourbusiness.co.ke) and make sure WP Mail SMTP is configured so order emails are delivered. - Check the Shop, Cart, Checkout and My account pages exist (WooCommerce → Status → Tools can recreate them).
- Place a real test order with a small amount using each payment method, then refund/cancel it.
Step 9: Keep the shop fast and safe
- LiteSpeed Cache with WooCommerce support — it automatically skips caching cart and checkout pages. See Speed up WordPress.
- Daily database backups (orders change every day) — Back up WordPress.
- Security plugin and 2FA — Security checklist.
Troubleshooting
| Problem | Cause | Fix |
|---|---|---|
| Customers don’t receive order emails | WordPress mail not authenticated | Install WP Mail SMTP with a real mailbox; set up SPF/DKIM |
| M-Pesa STK push not arriving | Daraja app not live, wrong shortcode/passkey, or callback URL blocked | Check credentials; ensure the site is on https; check plugin logs |
| Orders stuck “Pending payment” | Callback from payment provider not received | Check provider dashboard; WhatsApp us to check firewall logs |
| Checkout slow | Heavy theme/plugins, no caching | LiteSpeed Cache; remove unused plugins |
| Prices show decimals | Decimals setting | Set Number of decimals to 0 |
Figures are simplified illustrations. Your screen may look slightly different depending on your theme and the version of cPanel or the app you use.
Still need help?
Our Kenyan support team is on WhatsApp — real people, not bots. Mon–Sat, 8am–10pm EAT. Tickets are open 24/7.