
Knowledge Base · Email Setup
How to Use Gmail to Send and Receive Your Business Email
Already live in Gmail? You can keep using it and still send and receive as info@yourbusiness.co.ke. Customers see your business address; you get one inbox. It takes two parts — receiving, then sending.
This works on a desktop browser (gmail.com). The Gmail mobile app does not show these settings, but once set up, the mobile app can send as your business address too.
Before you start
- Create the mailbox in cPanel (Email → Email Accounts) — see Create a business email account. You need a real mailbox, not just a forwarder, to send through our server.
- Make sure SPF and DKIM are installed (Email → Email Deliverability). Without them Gmail’s recipients may see “via” warnings or mark mail as spam — see SPF, DKIM and DMARC.
Part 1: Receive business email in Gmail
Choose one option.
Option A: Gmail fetches it (POP3) — keeps a copy on our server
- In Gmail on a computer: ⚙ Settings → See all settings → Accounts and Import.
- Under Check mail from other accounts, click Add a mail account.
- Enter
info@yourbusiness.co.ke→ Next → Import emails from my other account (POP3) → Next. - Fill in:
– Username:info@yourbusiness.co.ke(full address)
– Password: mailbox password
– POP Server:mail.yourbusiness.co.ke— Port: 995
– ✅ Always use a secure connection (SSL)
– ✅ Leave a copy of retrieved message on the server (recommended — keeps webmail and backups complete)
– ✅ Label incoming messages (e.g. Business) - Add Account.
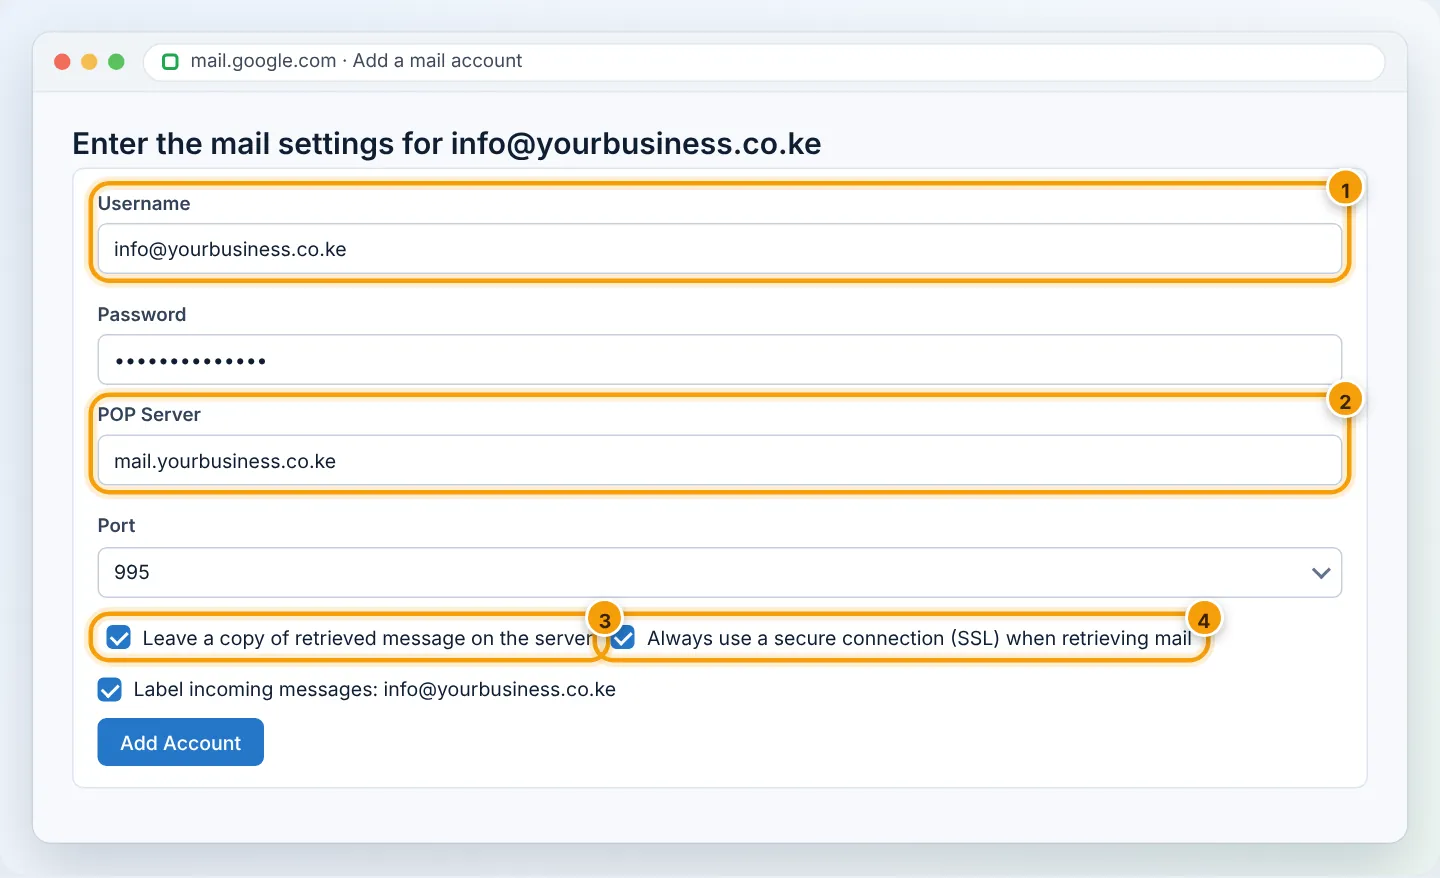
Gmail checks for new mail roughly every few minutes to an hour (Gmail decides the timing).
Option B: Instant delivery with a forwarder
For instant arrival, set up a forwarder in cPanel (Email → Forwarders: info@ → your Gmail). See Forward emails to Gmail. Do not use both A and B, or you will get duplicates.
Part 2: Send as your business address
- Still in Accounts and Import, under Send mail as, click Add another email address.
- Name: your name or business name. Email address:
info@yourbusiness.co.ke. Untick Treat as an alias if this is a shared role address → Next Step. - Fill in the SMTP server:
– SMTP Server:mail.yourbusiness.co.ke— Port: 465
– Username:info@yourbusiness.co.ke— Password: mailbox password
– Secured connection using SSL - Add Account.

- Gmail sends a confirmation code to
info@yourbusiness.co.ke. If you did Part 1, it arrives in Gmail; otherwise open webmail (yourbusiness.co.ke/webmail). Enter the code (or click the link) → Verify.
Part 3: Make it the default (optional)
In Accounts and Import → Send mail as, click make default next to your business address, and choose Reply from the same address the message was sent to.
When composing, click the From line to choose which address to send from.

Troubleshooting
| Gmail says | Cause | Fix |
|---|---|---|
| “Authentication failed. Please check your username/password.” | Short username or wrong password | Use the full address; test in webmail |
| “Server denied POP3 access” | POP3 port/SSL wrong | Port 995 with SSL |
| “Couldn’t reach server” | Typo in server name | mail.yourbusiness.co.ke exactly |
| Recipients see “sent via gmail.com” | Sending without your SMTP server | Use Part 2 with your own SMTP, not Gmail’s |
| Emails arrive twice | Both POP3 import and a forwarder | Use only one receiving method |
| Mail to customers goes to spam | Missing SPF/DKIM | Email Deliverability → install records |
Figures are simplified illustrations. Your screen may look slightly different depending on your theme and the version of cPanel or the app you use.
Still need help?
Our Kenyan support team is on WhatsApp — real people, not bots. Mon–Sat, 8am–10pm EAT. Tickets are open 24/7.